


Understanding BIPV: How It Differs from Traditional Solar Mounting
Defining building-integrated photovoltaics (BIPV) solar panel mounting systems
Building integrated photovoltaics, or BIPV for short, basically turn parts of buildings themselves into power generators. Think about rooftops, exterior walls, even windows becoming sources of electricity instead of just being there for looks or protection. These systems work differently from those standard solar panels we see stuck on top of houses with metal frames. Instead, they actually take the place of regular construction materials like shingles or window glass without compromising how strong the building remains. The US Department of Energy has looked into this stuff and found something interesting: when buildings incorporate these energy producing elements right from the start, they end up saving on materials and using space better than if someone goes back later to install solar panels after everything else is already built. Their research shows around a 23 percent improvement in space utilization over traditional retrofits.
Key differences between BIPV and rack-mounted solar installations
Building integrated photovoltaics (BIPV) cut down on extra mounting equipment since they embed solar cells right into the waterproof parts of buildings themselves. The look is much cleaner compared to those bulky rack systems most people see on rooftops, plus it actually solves some heat transfer issues that plague regular solar panels. According to research published last year in Renewable Energy Focus, these combined systems can save between 18 and 24 percent on installation expenses because builders don't have to install separate power generation components after completing the main structure work.
Functional integration of BIPV into the building envelope
When it comes to integrating BIPV into buildings, we're generally looking at swapping out around 15 to maybe even 30 percent of standard roofing or cladding materials for those photovoltaic options. The exact numbers depend largely on what local building regulations require in different regions. What makes these systems so impressive is their ability to handle pretty extreme conditions too. They need to stand up against winds blowing at speeds approaching 130 miles per hour and still perform well under heavy snow loads that can exceed 40 pounds per square foot without compromising water resistance. Thanks to recent breakthroughs like frameless solar glass panels and those clever interlocking PV shingle designs, architects now have much greater flexibility. These new technologies work seamlessly across roof angles ranging from very steep slopes of about 60 degrees down to gentler inclines as low as just 5 degrees, making them suitable for almost any kind of building design.
Structural Assessment and Roof Compatibility for BIPV Installation
Evaluating Roof Integrity and Load Capacity Before BIPV Mounting
When looking at structural integrity for BIPV installations, the first step is checking out what condition the roof is actually in. We need to know about materials used and how strong those framing components still are. Most BIPV systems will add around 4 to 6 pounds per square foot as extra weight on top of everything else already there. That means trusses and floor joists must be able to carry not just the solar panels themselves but also deal with all sorts of weather impacts over time. For buildings where the roof has been around since before 2008 or so, chances are pretty good that some kind of reinforcement work will be necessary just to comply with today's safety standards. According to recent findings from experts in the roofing field back in 2023, nearly 4 out of every 10 BIPV retrofits ended up needing extra steel supports because they couldn't handle heavy snow accumulation above 30 pounds per square foot in areas with harsh winter conditions.
Impact of Wind Loads and Snow Accumulation on Mounting System Design
When it comes to wind uplift forces, these can actually increase structural stress by around 1.3 times what we see in regular roofing setups, which means most buildings need those special edge clamping systems to hold everything together properly. For areas where snow is common, if solar panels are mounted at angles under 30 degrees, there's about a 60 percent chance of holding onto more ice than desired, and this creates some pretty nasty pressure spots on the roof surface. Some studies done in places like Scandinavia showed that when building integrated photovoltaic arrays were installed at better slopes, they experienced roughly 72 fewer instances of cracks caused by snow weight compared to when they were just laid flat across rooftops. Makes sense why many contractors now recommend proper angling as part of their installation process.
Engineering Standards and Compliance in Structural Assessments
BIPV installations need to meet the International Building Code (IBC 2021) standards when it comes to how they handle sideways forces and support their own weight. For anyone working on these projects, getting third party certifications matters a lot. The UL 2703 certification checks out the mounting hardware while IEC 61215 looks at how long the modules will last under various conditions. These aren't just paper credentials either they actually set real world performance expectations. According to the Residential BIPV Roof Covering Guidelines published by Sustainable Energy Action back in 2023, there's also this important requirement about fire ratings. Systems have to show they can handle fires properly with classifications ranging from Class A down to C depending on what area they're installed in. Local regulations determine exactly which class is needed for each project location.
Optimizing Solar Exposure: Orientation, Tilt, and Shading Considerations
Maximizing Energy Yield with Optimal Panel Orientation and Tilt Angles
BIPV systems work best when their panels are positioned according to how the sun moves across the sky. For locations north of the equator, pointing panels roughly 15 degrees off true south can boost yearly energy production by about 18 percent over setups facing east or west, according to research from the Solar Energy Research Group last year. Getting the angle right matters too. When modules are tilted to match the latitude where they're installed, they collect sunlight more efficiently throughout the seasons. Take Madrid as an example city sitting at around 40 degrees north latitude. Panels angled at 40 degrees there cut down on winter power loss by nearly a third compared to just laying them flat on rooftops.
Shading Analysis and Site-Specific Solar Access Considerations
When installing BIPV systems in urban areas, it's really important to do thorough shading studies with 3D modeling software to understand how much sun hits different parts of the building throughout the year. Research from around 2022 found that nearby buildings can cut energy production by anywhere between 9% and 27% for mid rise structures, which means we need flexible mounting options that can adapt to these conditions. On sloped rooftops especially, sophisticated simulation programs help pinpoint the best spots for panels where shadows only last under 15 minutes each day on average. These short periods of shade make a big difference when calculating overall system performance.
Case Study: Performance Gains from Precise Alignment in Urban BIPV Setups
A Barcelona retrofit project demonstrated the value of precision alignment — adjusting panel azimuth by 8° and tilt by 12° increased energy harvest by 22% despite 58% façade shading. The design used staggered mounting brackets to offset chimney shadows while maintaining architectural integrity, proving targeted orientation adjustments can overcome urban constraints.
Mounting Techniques and Waterproofing Strategies for Reliable BIPV Integration
Installation of Columns, Stringers, and Beams in BIPV Configurations
The mounting systems for building integrated photovoltaics need careful engineering since they have to handle both structural requirements and the special needs of solar panels. Most installations rely on steel columns paired with aluminum stringers as their main frame, which helps spread out the weight of all those panels so it doesn't put too much stress on any one wall. According to research from NREL in 2023, adjusting how far apart beams are placed can actually cut down on materials needed by around 18%, all without compromising the strength of the whole setup. When dealing with sloped roof designs, builders often turn to triangular trusses because these shapes resist bending even when subjected to pretty strong winds, meeting the IBC 2021 specifications for wind resistance at speeds up to 140 miles per hour.
| Component | Material | Key Function |
|---|---|---|
| Columns | Galvanized steel | Vertical load transfer to foundation |
| Stringers | Anodized aluminum | Lateral panel support & thermal expansion management |
| Beams | Carbon steel | Spanning between columns to reduce roof penetration |
Adapting W-Type Water Channels and Clamps for Varied Roof Geometries
The W profile drainage channel works really well for those tricky curved or odd shaped roofs we see so much these days in contemporary buildings. When installed on standing seam metal roofs, special brackets hold everything in place while keeping the waterproof layer intact underneath. Studies indicate that these W type systems cut down on water getting through by about 43 percent when compared against regular gutters, especially important places where there's more than 40 inches of rain falling each year. That kind of performance makes them worth considering for many different types of construction projects.
Sealing Edges and Overlaps to Prevent Moisture Ingress
Critical sealing zones include panel-to-flashing junctions, skylight perimeters, and parapet wall transitions. Butyl-based sealants combined with EPDM gaskets create durable barriers, while heat-applied bituminous membranes achieve 0.02 perm ratings in humidity-prone regions. The 75–100mm overlap standard (ASTM D1970) prevents capillary action even during cyclic thermal movement.
Ensuring Effective Drainage and Long-Term Durability Against Leaks and Thermal Bridging
A dual drainage approach combines surface-level channels diverting 80% of stormwater and a sub-membrane secondary drainage plane. Fiber-reinforced polymer spacers between mounting hardware and roofing layers reduce thermal bridging by 62%, per 2022 Oak Ridge National Lab findings. Annual infrared thermography inspections help detect early-stage moisture accumulation behind cladding systems.
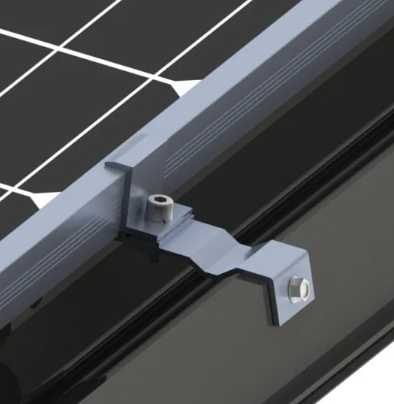
Electrical Safety, Fixation Best Practices, and Maintenance of BIPV Systems
Securing Panels With Mid and End Clamps: Best Practices and Torque Specifications
Getting those clamps installed correctly really helps stop mechanical failures from happening in BIPV systems and keeps them weather resistant too. For mid clamps, we generally space them around 24 inches apart max. The torque needs to be somewhere between 30 to 35 inch pounds so we don't end up either squeezing the PV modules too tight or leaving gaps. End clamps need a bit more muscle power though at 40 to 45 inch pounds since they have to fight off wind uplift when pressures go above 30 psf in areas prone to hurricanes according to ASCE standards. Stainless steel hardware works best for everything here, especially when paired with EPDM buffers. This combination stops problems caused by different metals reacting together and also handles temperature changes better than other materials would.
Wiring Integration and Electrical Safety Protocols in BIPV
When installing BIPV systems, following NFPA 70B wiring standards becomes essential, particularly when dealing with DC voltages exceeding 80 volts where arc-fault circuit interrupters (AFCIs) should be incorporated. Leaving around 12 inches space between conduits and building structures isn't just good practice it actually makes those mandatory infrared checks under NFPA 70E much easier to perform safely. Safety remains paramount throughout these operations. Lockout tagout (LOTO) procedures must always be strictly followed whenever maintenance work is underway. For electrical systems running above 600 volts, establishing a safe zone of approximately 48 inches around potential arc flash areas is non-negotiable. And let's not forget regular testing too annual insulation resistance tests at 1000 volts DC lasting about a minute help catch issues before they become major problems down the line.
Routine Maintenance and Inspection Schedules for BIPV Mounts
A three-tier maintenance strategy optimizes BIPV performance:
- Quarterly: Infrared scans to detect hot spots exceeding 5°C in junction boxes
- Biannual: Sealant integrity checks using 200 psi water jet testing
- Annual: Torque verification on 10% of clamps (within ±10% tolerance)
Balancing Minimal Visual Impact With Serviceability in BIPV Design
Modern BIPV systems achieve 92% hidden wiring through channelized framing systems while supporting module replacement in under 15 minutes. Recessed access panels (minimum 12"x12"), spaced at 36-inch intervals, allow tool-free component swaps without compromising air or water barriers.
Table of Contents
- Understanding BIPV: How It Differs from Traditional Solar Mounting
- Structural Assessment and Roof Compatibility for BIPV Installation
- Optimizing Solar Exposure: Orientation, Tilt, and Shading Considerations
- Mounting Techniques and Waterproofing Strategies for Reliable BIPV Integration
- Electrical Safety, Fixation Best Practices, and Maintenance of BIPV Systems